Primary Arms: Holosun Paralow HS503G meets ACSS
The Primary Arms series of optics never seems to disappoint and this Holosun offering is no exception. Our test example came with a bikini style scope cover, two mounts and a wrench. Holosun has been a company I have been keeping an eye on for a while for long arm optics, particularly offering unmagnified optics at great prices with some high-end options. While I am an unrelenting advocate of equipping magnified optics on rifles, a small handy rifle that is meant to fill a specific role as an entry weapon or PDW (Personal Defense Weapon) can benefit greatly from an optic such as this one. Thanks to Primary Arms for the opportunity to ravage a Holosun product and test out a very interesting new ACSS optic combination.
Build
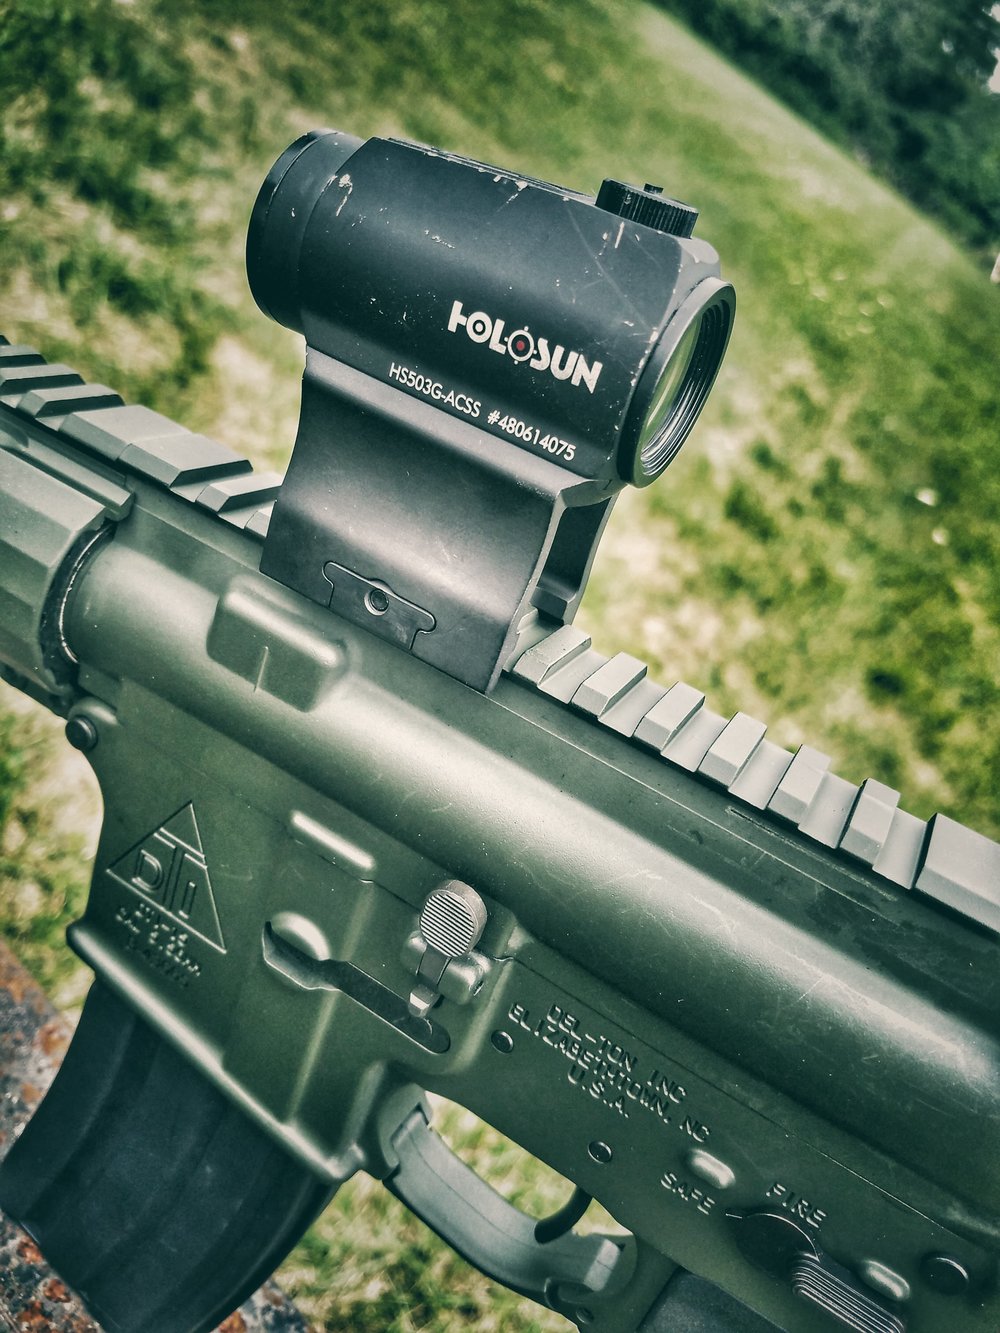
This test optic is the HS503G-ACSS model, serial #480614075. Like many Holosun optics it has a profile that closely resembles the ubiquitous Aimpoint Micro. However, these Holosun products are generally less than half the price and can take a serious beating as we will see later. It came with two mounts, a low for AK or shotgun mounting, and a pass-through style AR lower 1/3rd mount that did quite a bit to lighten an already small mount. I suppose a set of low-profile iron sights could be used in this space if mounted on a firearm with a very low comb. On the top of the optic is two exposed buttons that function as your brightness and on-off controls, labeled with a “+” and a “-” respectively. Elevation and windage adjustment knobs are capped and are found on the top and right side of the optic. Also found on the right side of the optic is the battery compartment, where a coin style 2032 battery powers the unit. A single torx screw locks the AR mount to any standard picatinny rail.
Reticle
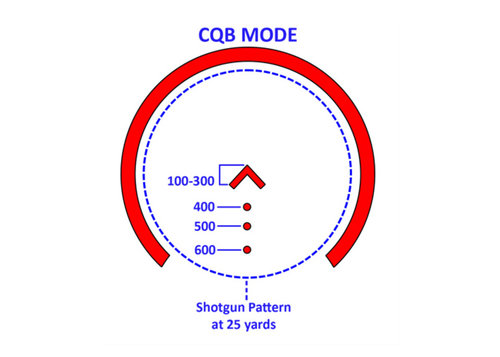
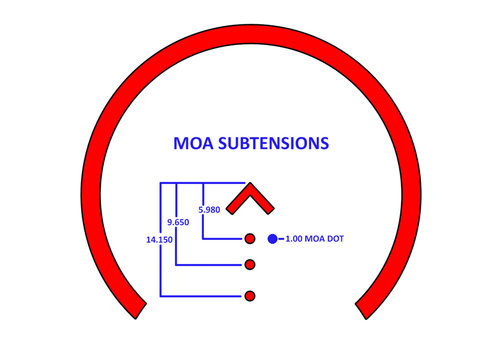
This version of the ACSS reticle sports a center chevron with a surrounding “death donut”. Below the chevron is a series of three dots. The tip of the chevron is designed to be zeroed at 100m for a 5.56mm rifle. The chevron and dots act as a bullet drop compensator (BDC). The chevron base acts as a 300m hold, while the first dot is the 400m hold, second dot is 500m hold, and 600m hold for the last dot. This is the CQB mode where the donut assists in getting that flash sight picture for fast acquisition, and also provides lateral hold points for a fast-moving target. Using the brightness buttons, you can switch to “Mid-Range” mode which eliminates the Death Donut and retains the Chevron and bullet drop compensating dots. The brightness settings are well done and buttons easy to use. The rifle was fired both in low light and high noon conditions on a clear day, and the brightness was more than adequate for day shooting.
Zeroing
The optic was mounted to my patrol rifle, which sports a .223 Wylde chamber and a 16-inch-long barrel with a 1/8 twist rate, running on a mid-length direct impingement gas system. Zero was done at the prescribed 100m with surplus M855 62 grain green tip ammunition. This ammunition was used for the zero as it provides a good midpoint for the other two cartridges used for testing, brass cased PMC 55 grain on the budget/training end and Black Hills 77 grain OTM on the precision/duty end. Of note, I work in meters and this reticle is designed to be zeroed in yards. This is generally not significant when shooting with an unmagnified optic.
Intermediate Distance (100+ meters)
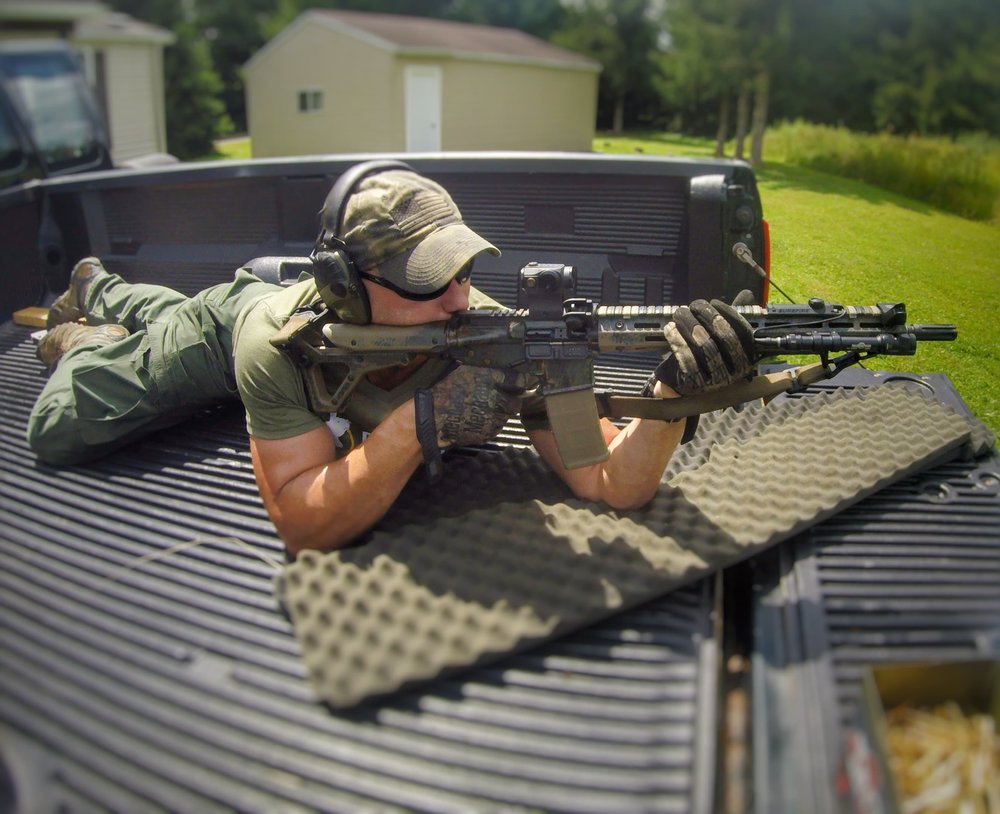
For intermediate testing I had a range that allowed me to shoot to just over 400 meters. It was a bright sunny say with a 0 value 5-10 mph tail wind at the firing line and 200m, and no perceivable wind at 400m. Targets at 100m, 200m, and 250m were a paper silhouette style target, a steel ¾ IPSC target at 325m and an 8” steel gong at 404m. Shooting was done from a prone position, sling supported. I started with the M855, then the PMC 55 grain, and then the Black Hills ammunition. 10 shot groups were fired at the paper targets, while a series of independent shots were thrown at the steel (sans the M855). The results were rather pleasant. There was little change in the 10 shot groups for practical purposes between three different loads. A center hold on the target with the appropriate hold over guaranteed an upper thoracic hit on the paper targets regardless of bullet. Once I found the correct hold, I did have some difficulty with the PMC at the 404m steel gong as I missed several shots. This was likely due to the ammunition, as the target is about 2 MOA at this distance. The Black Hills OTM rang it every time but once, and that was due to a slippage in my fundamentals. Again, the hold was the same for both cartridges, slightly favoring the upper portion of the gong with the 400m dot. I then loaded two magazines with the PMC and Black Hills mixed together randomly. The holds on the reticle held true, and I could not honestly discern with certainty what cartridge was being fired.
The reticle works well as a BDC with some caveats. The chevron is designed to be used for ranging as the outside corners of the chevron match up with the shoulders of a silhouette target at 200, and the inside to match shoulder width at 300. My test example seemed a bit off at 300m having the shoulders match up closer to 320m. Then again, yards are longer than meters so perhaps that is the issue. I just don’t speak English when it comes to measuring range and distance. The glass has a slight bluish “tint” to it which I found distracting but still very useable though it significantly changed the brightness and color of what I was looking at. It is not an issue unless you’re using it for observation, which is completely outside its intended use.
I placed silhouette targets at 300-400m lines and moved back another 120 meters giving me a total distance of just over 520 meters. While I could not safely fire at this position, it gave me an idea of how the reticle would look. It should be mentioned that man sized targets will be difficult to identify at such distances. Anyone who qualified with iron sights out to 500 can attest to this. The series of three dots providing a hold for each 100m mark from 400m to 600m made the reticle very cluttered and it was difficult to determine exactly where I was holding on a dark silhouette in the 4 to 500m ranges. For this type of shooting I think it would be a benefit if a two dot BDC was used instead, or the addition of a 3x magnifier may remedy this. Unfortunately, I did not have a magnifier available. With that being said, the optic does have a “Mid-range” mode that eliminates the “Death Donut” but I did not find the presence of the donut as much of a problem as I did with the three circles being too close together. I would prefer a reticle that would have a 2-dot system that would perhaps move the dots for mid-range mode and eliminate the “quarter mile clutter”. Admittedly this is a less than fair gripe against any red dot optic but heck, it’s got a BDC for those ranges…
Close In (contact to 100m)
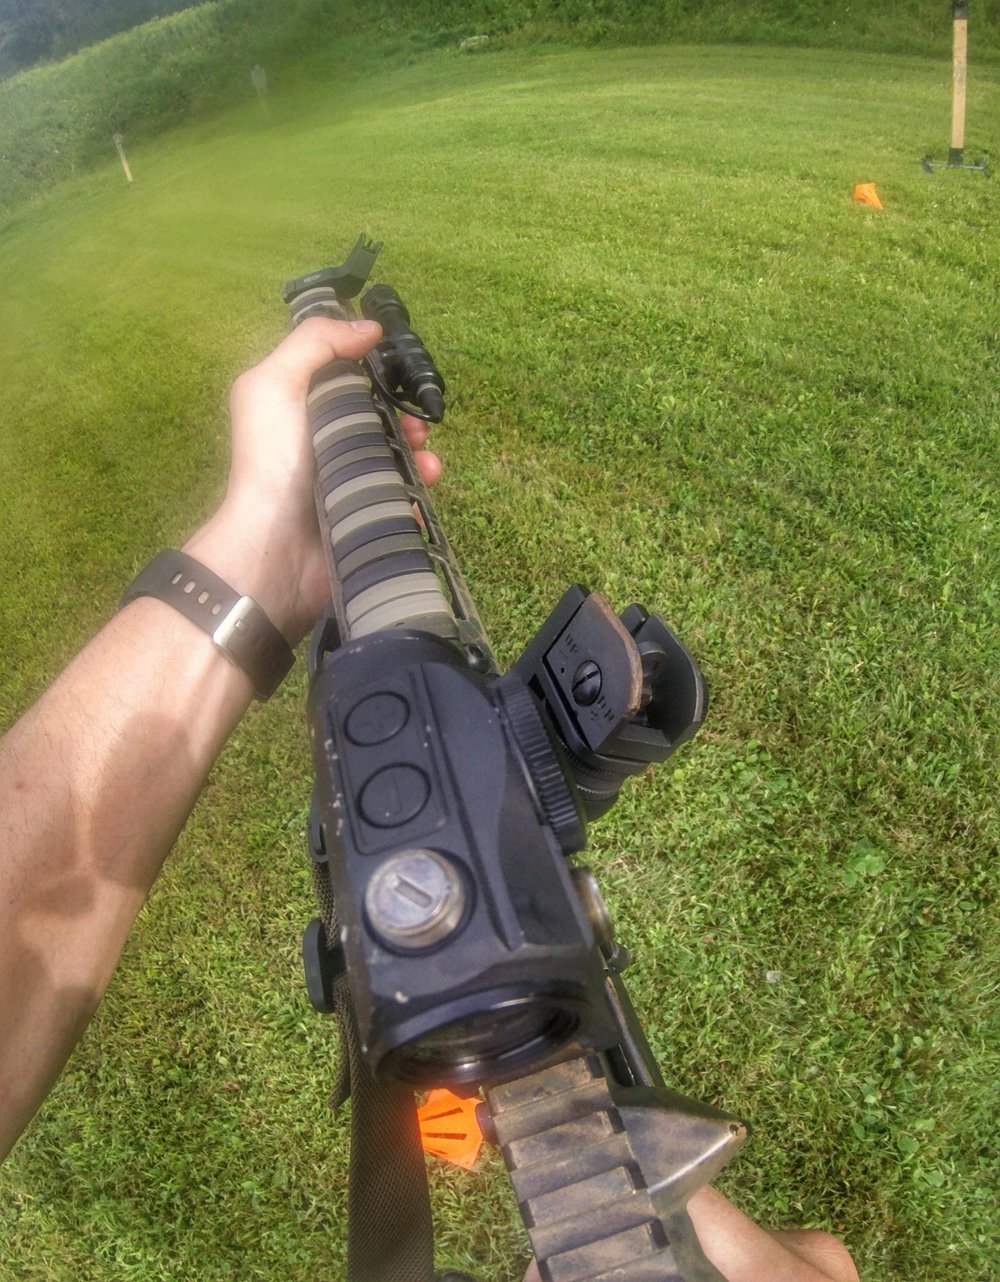
Testing for close in work was done on another day at a different range under overcast and occasionally rainy conditions. Shooting was varied involving timed drills, high round counts, a lot of dynamic movement, and different positions. Big takeaway here is I love the reticle in a micro red dot. That Death Donut gets you on target crazy fast as is very easy to pick up when mounting the rifle in a hurry. It’s what every Aimpoint that ever went into harm’s way should have always had. It speed shoots like an EOtech without the bulk. This is the ideal budget home defense optic if one can’t afford something more “combat” proven.
I did find a significant level of parallax that caused me some accuracy issues at 50m+. I missed head shots that I normally would have made even though the reticle wasn’t perfectly aligned in the center while shooting fast. In hindsight I wish I did the close in testing first so that I could really measure how much parallax the optic has during intermediate range testing. Next time I test a red dot, parallax will be at the top of the list, I'm just not used to seeing this much of it. In any event there is parallax and it should be noted. This is the only significant drawback that I see from this optic within the confines of its intended purpose. For comparison, I do not notice any parallax with EOtech sights. With the EOtech the dot can be just about at the edge of the sight, but as long as that dot is superimposing the target head it’s going to hit. But again, this is a less than fair as the Holosun ACSS is a fraction of the cost that you’ll pay for an EOtech.
I used this optic in conjunction with two types of back up sights. I used a set of 45-degree offset sights, and a set of Knights Armament flip up sights. I have always been a proponent of using iron sights with a lower 1/3rd co-witness on unmagnified optics. It not only gives you the backup of an Iron sight in the event a battery dies or loses contact (thanks old school EOtech…), but it gives your red dot an impromptu BDC if you don’t have a reticle like the ACSS. This can be done to great effect at intermediate distance by knowing exactly where to put the target in your sight picture indexed between the dot and the post. However, combining the ACSS with a co-witness front sight does make for a rather cluttered sight picture and will slow you down getting on target close in.
Using a set of 45-degree offset irons has several advantages witch shine on a day like this. For one, the fixed 45-degree irons are always up. You never have to interrupt the pew to flip up a sight or worry about them inadvertently closing on you. Second, they are engaged and ready for use, without interrupting the sight picture of your optic. Third and most important is that several times when I brought the rifle up, the optic was completely occluded by rain water. With the 45-degree offsets, you simply rotate the rifle. For co-witnessed iron sights, you would have to stop and remove the optic or clean the lenses, and cleaning is somewhat pointless in the middle of a rainstorm. Now this is no fault of the optic itself just something to consider when adding backup sights. Since the ACSS is already a very effective BDC, it makes sense to run 45-degree offsets as a backup over a set of co-witness Iron sights. Unlike desert climates, sight occlusion is a bigger factor in Upstate New York with rain, snow, or the constant threat of fogging. It is because of this that I always recommend police officers who have rifles in the trunks of their patrol vehicles use offset irons. Even on a clear winter day, going from a frozen trunk immediately into a heated school will cause any glass to fog up, and that situation is one where your sight picture needs to be as clear as possible.
Longevity
A big plus to this optic is its advertised 50k hour lifespan for one battery. This puts the Holosun on par with many high-end optics. I find it good practice to set a date and change batteries once a year. Optics, Weapon Mounted Lights, fire alarms, whatever. Make sure you change your batteries. Not only will this optic always have plenty of battery life with that type of maintenance schedule, but it’s good practice in order to avoid corrosion issues. In addition to the Holosun’s great battery lifespan, it can be enhanced by an auto shutdown feature where the optic will shut off, and automatically turn back on when it senses movement. I tested this feature and it worked flawlessly. This feature can be disabled by the user if so desired.
Frank and I beat on this thing pretty good. It had a few dings and scratches when Frank passed it off to me, and I gave it a sound thrashing as well. To keep it short, nothing within reason is going to stop this little optic. Tossed from one story onto pavement while mounted to a dummy rifle, battle axed into a tree, or overnight under water. Nothing caused the optic to diminish in function or operation. The battery compartment remained moisture free, the glass did not crack, and the reticle kept it’s zero after chopping into a tree with it. You really can’t ask for more.

The Primary Arms series of optics never seems to disappoint and this Holosun offering is no exception. Our test example came with a bikini style scope cover, two mounts and a wrench. Holosun has been a company I have been keeping an eye on for a while for long arm optics, particularly offering unmagnified optics at great prices with some high-end options. While I am an unrelenting advocate of equipping magnified optics on rifles, a small handy rifle that is meant to fill a specific role as an entry weapon or PDW (Personal Defense Weapon) can benefit greatly from an optic such as this one. Thanks to Primary Arms for the opportunity to ravage a Holosun product and test out a very interesting new ACSS optic combination.
Build
This test optic is the HS503G-ACSS model, serial #480614075. Like many Holosun optics it has a profile that closely resembles the ubiquitous Aimpoint Micro. However, these Holosun products are generally less than half the price and can take a serious beating as we will see later. It came with two mounts, a low for AK or shotgun mounting, and a pass-through style AR lower 1/3rd mount that did quite a bit to lighten an already small mount. I suppose a set of low-profile iron sights could be used in this space if mounted on a firearm with a very low comb. On the top of the optic is two exposed buttons that function as your brightness and on-off controls, labeled with a “+” and a “-” respectively. Elevation and windage adjustment knobs are capped and are found on the top and right side of the optic. Also found on the right side of the optic is the battery compartment, where a coin style 2032 battery powers the unit. A single torx screw locks the AR mount to any standard picatinny rail.
Reticle


This version of the ACSS reticle sports a center chevron with a surrounding “death donut”. Below the chevron is a series of three dots. The tip of the chevron is designed to be zeroed at 100m for a 5.56mm rifle. The chevron and dots act as a bullet drop compensator (BDC). The chevron base acts as a 300m hold, while the first dot is the 400m hold, second dot is 500m hold, and 600m hold for the last dot. This is the CQB mode where the donut assists in getting that flash sight picture for fast acquisition, and also provides lateral hold points for a fast-moving target. Using the brightness buttons, you can switch to “Mid-Range” mode which eliminates the Death Donut and retains the Chevron and bullet drop compensating dots. The brightness settings are well done and buttons easy to use. The rifle was fired both in low light and high noon conditions on a clear day, and the brightness was more than adequate for day shooting.
Zeroing
The optic was mounted to my patrol rifle, which sports a .223 Wylde chamber and a 16-inch-long barrel with a 1/8 twist rate, running on a mid-length direct impingement gas system. Zero was done at the prescribed 100m with surplus M855 62 grain green tip ammunition. This ammunition was used for the zero as it provides a good midpoint for the other two cartridges used for testing, brass cased PMC 55 grain on the budget/training end and Black Hills 77 grain OTM on the precision/duty end. Of note, I work in meters and this reticle is designed to be zeroed in yards. This is generally not significant when shooting with an unmagnified optic.
Intermediate Distance (100+ meters)

For intermediate testing I had a range that allowed me to shoot to just over 400 meters. It was a bright sunny say with a 0 value 5-10 mph tail wind at the firing line and 200m, and no perceivable wind at 400m. Targets at 100m, 200m, and 250m were a paper silhouette style target, a steel ¾ IPSC target at 325m and an 8” steel gong at 404m. Shooting was done from a prone position, sling supported. I started with the M855, then the PMC 55 grain, and then the Black Hills ammunition. 10 shot groups were fired at the paper targets, while a series of independent shots were thrown at the steel (sans the M855). The results were rather pleasant. There was little change in the 10 shot groups for practical purposes between three different loads. A center hold on the target with the appropriate hold over guaranteed an upper thoracic hit on the paper targets regardless of bullet. Once I found the correct hold, I did have some difficulty with the PMC at the 404m steel gong as I missed several shots. This was likely due to the ammunition, as the target is about 2 MOA at this distance. The Black Hills OTM rang it every time but once, and that was due to a slippage in my fundamentals. Again, the hold was the same for both cartridges, slightly favoring the upper portion of the gong with the 400m dot. I then loaded two magazines with the PMC and Black Hills mixed together randomly. The holds on the reticle held true, and I could not honestly discern with certainty what cartridge was being fired.
The reticle works well as a BDC with some caveats. The chevron is designed to be used for ranging as the outside corners of the chevron match up with the shoulders of a silhouette target at 200, and the inside to match shoulder width at 300. My test example seemed a bit off at 300m having the shoulders match up closer to 320m. Then again, yards are longer than meters so perhaps that is the issue. I just don’t speak English when it comes to measuring range and distance. The glass has a slight bluish “tint” to it which I found distracting but still very useable though it significantly changed the brightness and color of what I was looking at. It is not an issue unless you’re using it for observation, which is completely outside its intended use.
I placed silhouette targets at 300-400m lines and moved back another 120 meters giving me a total distance of just over 520 meters. While I could not safely fire at this position, it gave me an idea of how the reticle would look. It should be mentioned that man sized targets will be difficult to identify at such distances. Anyone who qualified with iron sights out to 500 can attest to this. The series of three dots providing a hold for each 100m mark from 400m to 600m made the reticle very cluttered and it was difficult to determine exactly where I was holding on a dark silhouette in the 4 to 500m ranges. For this type of shooting I think it would be a benefit if a two dot BDC was used instead, or the addition of a 3x magnifier may remedy this. Unfortunately, I did not have a magnifier available. With that being said, the optic does have a “Mid-range” mode that eliminates the “Death Donut” but I did not find the presence of the donut as much of a problem as I did with the three circles being too close together. I would prefer a reticle that would have a 2-dot system that would perhaps move the dots for mid-range mode and eliminate the “quarter mile clutter”. Admittedly this is a less than fair gripe against any red dot optic but heck, it’s got a BDC for those ranges…
Close In (contact to 100m)

Testing for close in work was done on another day at a different range under overcast and occasionally rainy conditions. Shooting was varied involving timed drills, high round counts, a lot of dynamic movement, and different positions. Big takeaway here is I love the reticle in a micro red dot. That Death Donut gets you on target crazy fast as is very easy to pick up when mounting the rifle in a hurry. It’s what every Aimpoint that ever went into harm’s way should have always had. It speed shoots like an EOtech without the bulk. This is the ideal budget home defense optic if one can’t afford something more “combat” proven.
I did find a significant level of parallax that caused me some accuracy issues at 50m+. I missed head shots that I normally would have made even though the reticle wasn’t perfectly aligned in the center while shooting fast. In hindsight I wish I did the close in testing first so that I could really measure how much parallax the optic has during intermediate range testing. Next time I test a red dot, parallax will be at the top of the list, I'm just not used to seeing this much of it. In any event there is parallax and it should be noted. This is the only significant drawback that I see from this optic within the confines of its intended purpose. For comparison, I do not notice any parallax with EOtech sights. With the EOtech the dot can be just about at the edge of the sight, but as long as that dot is superimposing the target head it’s going to hit. But again, this is a less than fair as the Holosun ACSS is a fraction of the cost that you’ll pay for an EOtech.
I used this optic in conjunction with two types of back up sights. I used a set of 45-degree offset sights, and a set of Knights Armament flip up sights. I have always been a proponent of using iron sights with a lower 1/3rd co-witness on unmagnified optics. It not only gives you the backup of an Iron sight in the event a battery dies or loses contact (thanks old school EOtech…), but it gives your red dot an impromptu BDC if you don’t have a reticle like the ACSS. This can be done to great effect at intermediate distance by knowing exactly where to put the target in your sight picture indexed between the dot and the post. However, combining the ACSS with a co-witness front sight does make for a rather cluttered sight picture and will slow you down getting on target close in.
Using a set of 45-degree offset irons has several advantages witch shine on a day like this. For one, the fixed 45-degree irons are always up. You never have to interrupt the pew to flip up a sight or worry about them inadvertently closing on you. Second, they are engaged and ready for use, without interrupting the sight picture of your optic. Third and most important is that several times when I brought the rifle up, the optic was completely occluded by rain water. With the 45-degree offsets, you simply rotate the rifle. For co-witnessed iron sights, you would have to stop and remove the optic or clean the lenses, and cleaning is somewhat pointless in the middle of a rainstorm. Now this is no fault of the optic itself just something to consider when adding backup sights. Since the ACSS is already a very effective BDC, it makes sense to run 45-degree offsets as a backup over a set of co-witness Iron sights. Unlike desert climates, sight occlusion is a bigger factor in Upstate New York with rain, snow, or the constant threat of fogging. It is because of this that I always recommend police officers who have rifles in the trunks of their patrol vehicles use offset irons. Even on a clear winter day, going from a frozen trunk immediately into a heated school will cause any glass to fog up, and that situation is one where your sight picture needs to be as clear as possible.
Longevity
A big plus to this optic is its advertised 50k hour lifespan for one battery. This puts the Holosun on par with many high-end optics. I find it good practice to set a date and change batteries once a year. Optics, Weapon Mounted Lights, fire alarms, whatever. Make sure you change your batteries. Not only will this optic always have plenty of battery life with that type of maintenance schedule, but it’s good practice in order to avoid corrosion issues. In addition to the Holosun’s great battery lifespan, it can be enhanced by an auto shutdown feature where the optic will shut off, and automatically turn back on when it senses movement. I tested this feature and it worked flawlessly. This feature can be disabled by the user if so desired.
Frank and I beat on this thing pretty good. It had a few dings and scratches when Frank passed it off to me, and I gave it a sound thrashing as well. To keep it short, nothing within reason is going to stop this little optic. Tossed from one story onto pavement while mounted to a dummy rifle, battle axed into a tree, or overnight under water. Nothing caused the optic to diminish in function or operation. The battery compartment remained moisture free, the glass did not crack, and the reticle kept it’s zero after chopping into a tree with it. You really can’t ask for more.

